Setting Up Playwright Test Reporting in 5 Minutes
Playwright ships with a solid HTML reporter. Open it locally and you get a clean interface: pass/fail per test, traces on failure, screenshots, the works. It is genuinely useful — for local development.
The problem starts in CI.
Your pipeline runs on a headless server, uploads an artifact nobody clicks, and prints a pass/fail line to the log. If a test fails, you get the stack trace for that run. What you do not get is any context: Was this test passing yesterday? Has it been flaky for the last two weeks? Did this regression appear after a specific deploy? To answer those questions today, you grep CI logs and cross-reference commit timestamps by hand. That works until it does not, and it stops working fast as your test suite grows.
What you actually need is a persistent record of every test run — with history, trends, and artifacts attached to each failure — that does not require you to hunt through CI artifacts to find. That is what SpecHive gives you.
Install the reporter
npm install -D @spechive/playwright-reporterThis adds the SpecHive reporter as a dev dependency. No other packages required.
Configure Playwright
Open your playwright.config.ts and add the reporter:
// playwright.config.ts
import { defineConfig } from '@playwright/test';

export default defineConfig({
  reporter: [
    ['html'],
    ['@spechive/playwright-reporter', {
      projectToken: process.env.SPECHIVE_PROJECT_TOKEN,
    }],
  ],
});
Two things to note here. First, the html reporter is kept alongside the SpecHive reporter — you do not have to choose. Local runs still produce the HTML report you already use for debugging. The SpecHive reporter runs in parallel and sends results to the dashboard without interfering with your existing workflow.
Second, projectToken is the credential that ties your test results to your SpecHive project. Get it from the SpecHive dashboard under Settings > API Tokens. The environment variable is SPECHIVE_PROJECT_TOKEN — that exact name, no variation. The reporter will not authenticate without it.
Run your tests
Once the config is in place, run your tests the same way you always have:
SPECHIVE_PROJECT_TOKEN=your_project_token npx playwright testIf you are running locally and want to check that reporting works before wiring up CI, you can pass the token inline like the example above. For CI, set SPECHIVE_PROJECT_TOKEN as a secret environment variable in your pipeline — the reporter will pick it up automatically.
Results appear in the SpecHive dashboard within seconds of the run completing.
What you get out of the box
Once your first run lands in the dashboard, you have access to everything that was missing from plain CI logs.
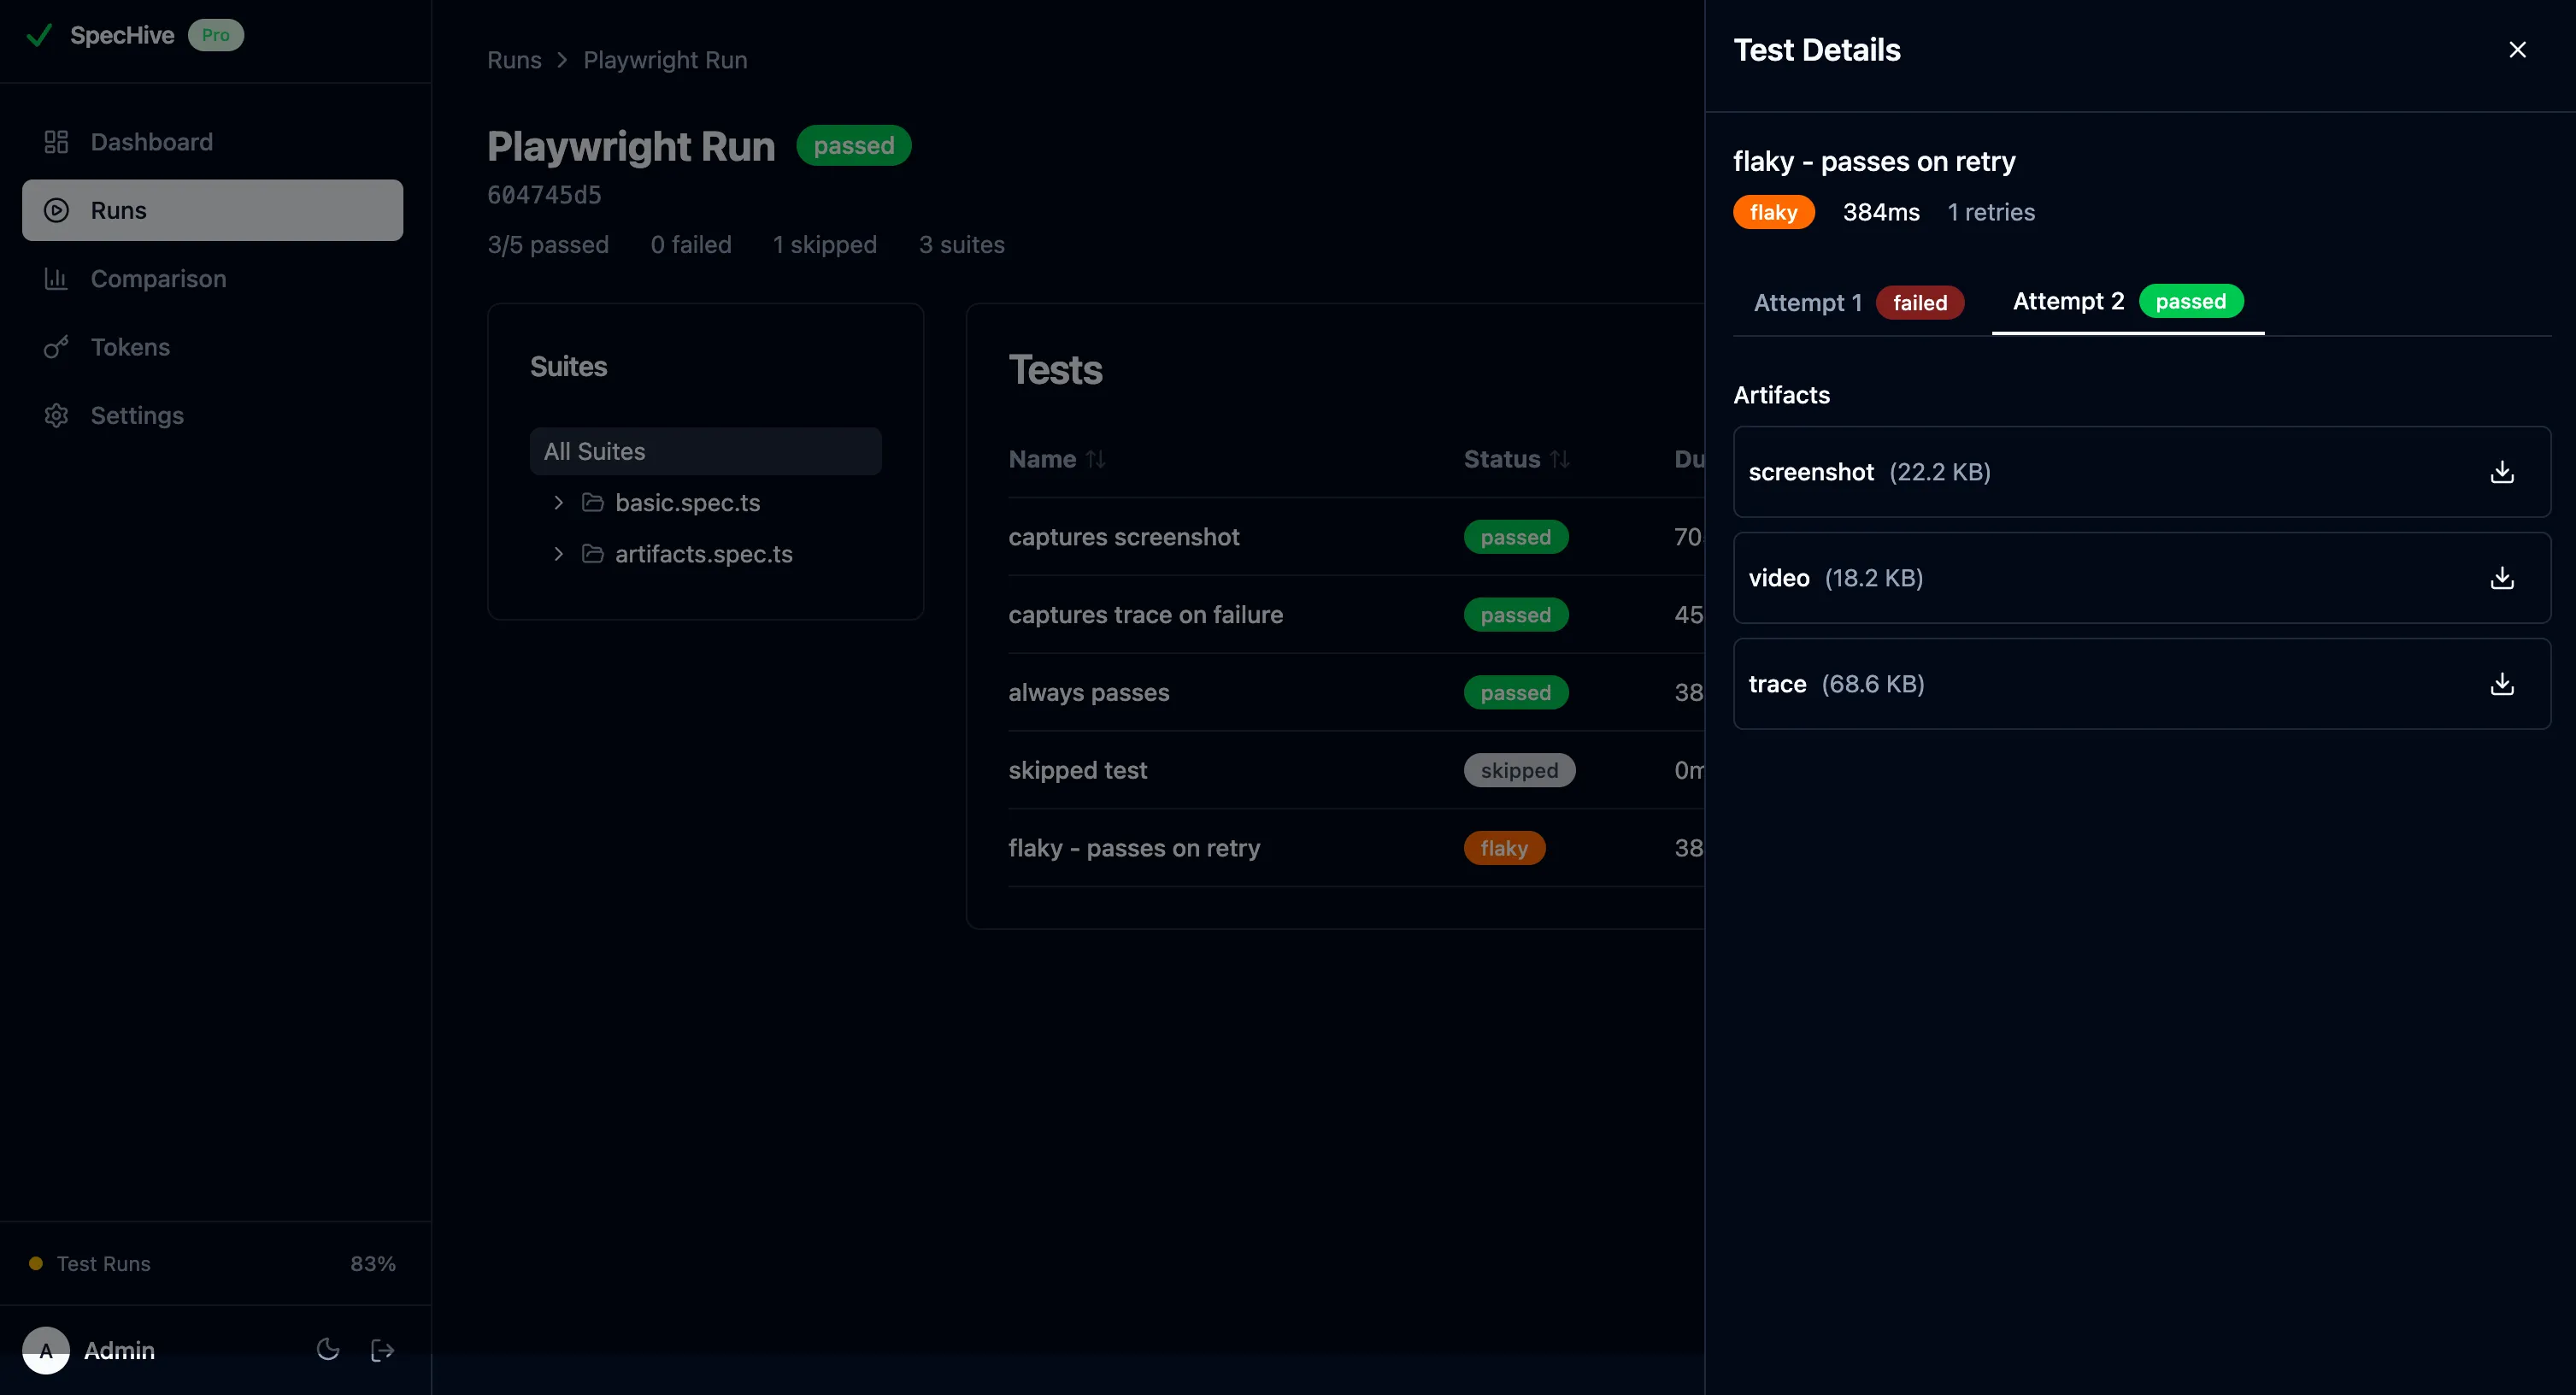
Test run history. Every run is recorded with a full pass/fail/flaky breakdown. You can look at any past run and see exactly which tests failed, how long they took, and what the environment looked like.
Duration trends. The dashboard tracks how long each test takes across runs. If a test that used to complete in 200ms is now consistently hitting 800ms, you will see it before it becomes a problem.
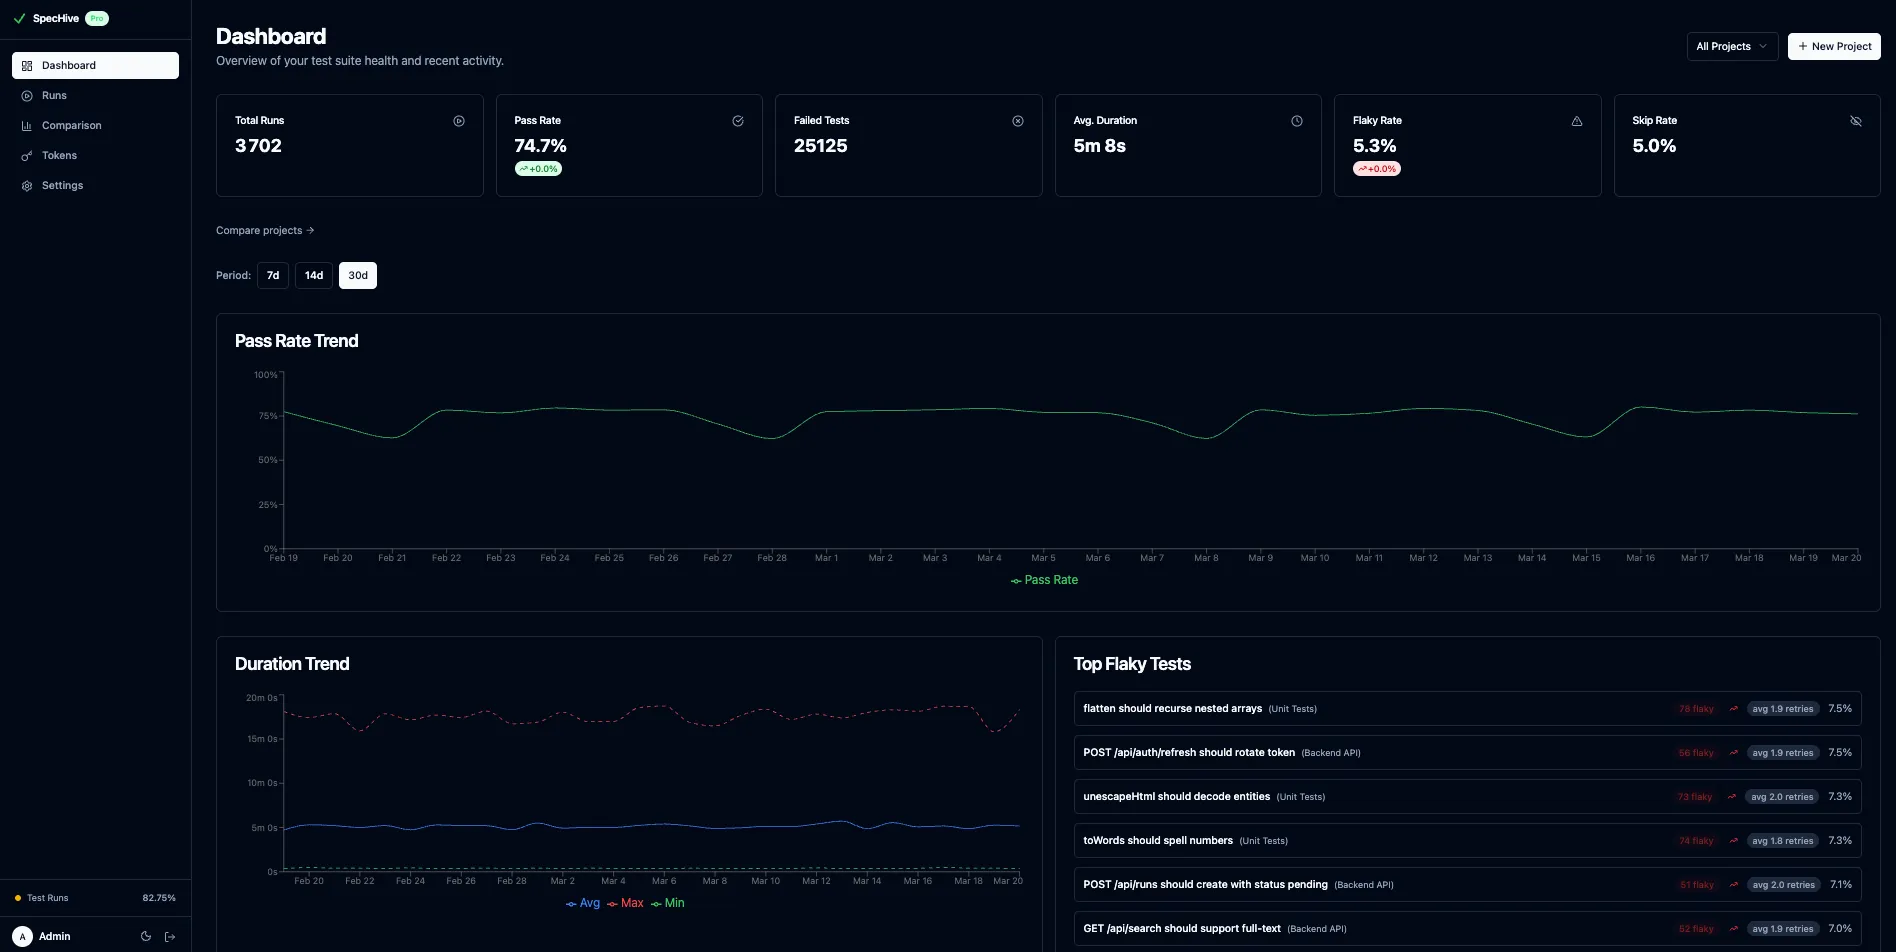
Artifacts attached to failures. Screenshots, videos, and Playwright traces are stored alongside the failure that produced them. No more downloading a zip from a CI artifact and unpacking it locally — click the failure in the dashboard and the trace opens in the browser.
Automatic flaky detection. If you have retries enabled in your Playwright config, SpecHive uses the retry data to identify tests that pass on retry. Flaky tests are flagged separately so they do not pollute your failure counts.
Organization-level analytics. If you run multiple projects, SpecHive aggregates results across all of them. A dedicated comparison page lets you compare pass rates, flaky rates, and durations side by side to understand which projects need attention.
Self-hosted or cloud
SpecHive offers two deployment options and both use the same reporter package.
Cloud is the fastest path: sign up at app.spechive.dev, create a project, copy the token, and you are done. The free tier covers 5,000 test results per month, which is enough for most small teams to evaluate it properly.
Self-hosted is the option for teams that cannot send test data to an external service. Clone the open-source repository and start the stack:
docker compose upYour data stays on your servers. The self-hosted option is free with no usage limits. To point the reporter at your self-hosted instance, add the apiUrl option to your config:
['@spechive/playwright-reporter', {
  apiUrl: 'https://your-self-hosted-instance.com',
  projectToken: process.env.SPECHIVE_PROJECT_TOKEN,
}]
That is the only config change required. Everything else — the dashboard, artifact storage, flaky detection — works identically.
CI integration
The reporter automatically detects CI environments. GitHub Actions, GitLab CI, Jenkins, CircleCI, and Azure DevOps are all recognized without any extra configuration. Detected CI metadata (branch name, commit SHA, pipeline URL) is attached to the run in the dashboard so you can trace any test result back to the exact commit that produced it.
For GitHub Actions, add the secret to your repository under Settings > Secrets and variables > Actions, then reference it in your workflow:
# .github/workflows/tests.yml
- name: Run Playwright tests
  run: npx playwright test
  env:
    SPECHIVE_PROJECT_TOKEN: ${{ secrets.SPECHIVE_PROJECT_TOKEN }}
No additional steps, no separate upload action, no post-processing. The reporter handles everything during the test run itself.
Next steps
The setup described here covers the baseline. Once your runs are landing in the dashboard, the next useful thing to look at is flaky test management — which tests are failing intermittently, how often, and whether the flakiness correlates with specific environments or times of day.